Red, White and Blue Charcuterie Cups – 4th of July Party Food Idea


If you are looking for a festive and fun way to serve up snacks at your 4th of July party, then you can’t go wrong with these Red, White and Blue Charcuterie Cups.
A fun and festive twist on the classic charcuterie board, they are the perfect patriotic treat for when you’re hosting a backyard BBQ, heading to a fireworks picnic, or just trying to keep the kids happily snacking.
Packed with a delicious mix of sweet and savory bites, these individual snack cups are super simple to put together, look adorable, and ideal for serving a crowd.

These little cups make patriotic party prep feel totally doable – and fun! Perfect for 4th of July, Memorial Day, or any summer event.
How to Make Red, White and Blue Charcuterie Cups
Here are the things you need to make these red, white and blue charcuterie cups, plus step by stem instructions for how to make them.
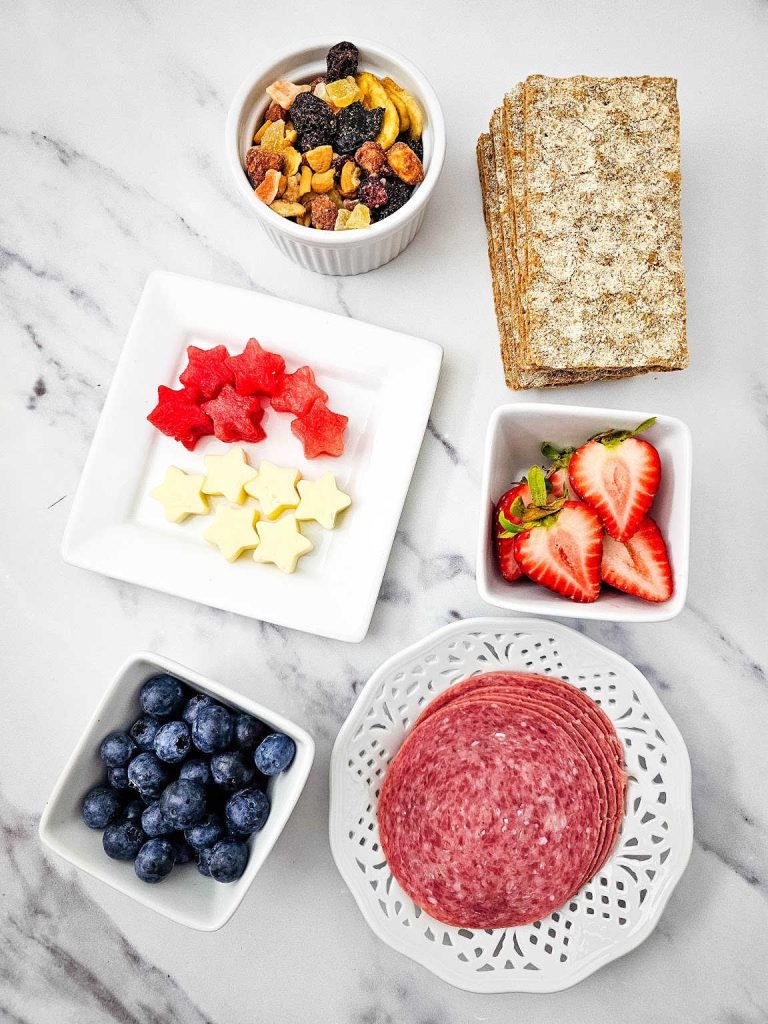
Tools
- 9 oz plastic cups
- Star fruit cutter
- Appetizer skewers
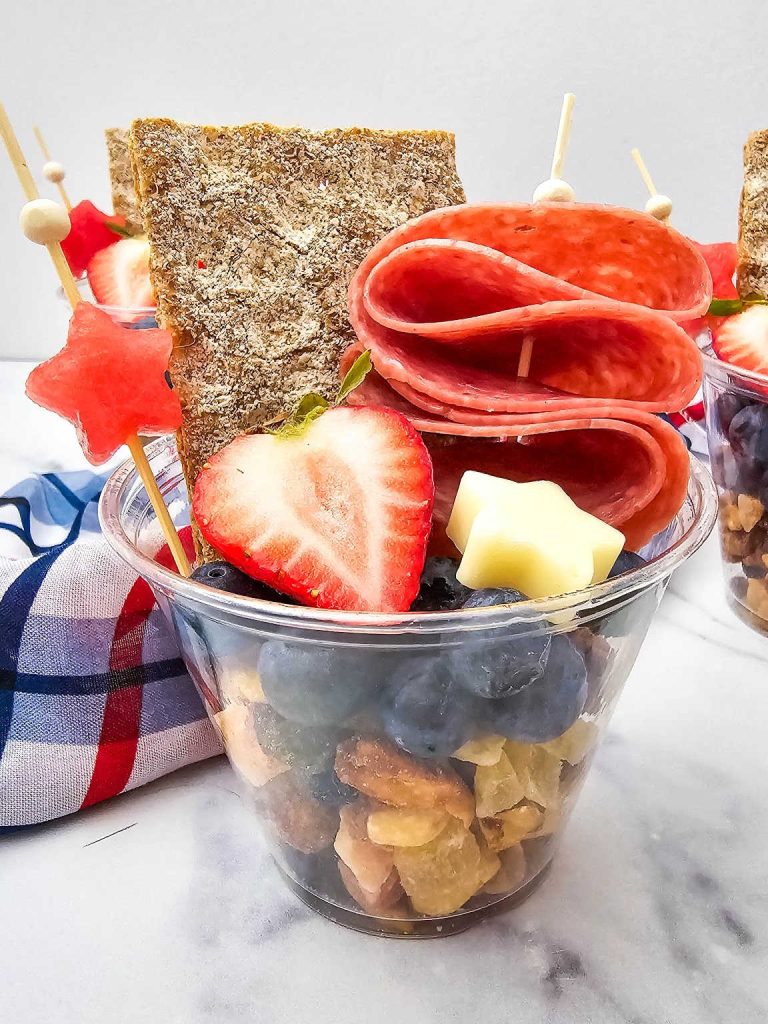
Ingredients
- 6 Large crackers
- 7 oz bag of trail mix (we used tropical, but you can use whatever you like)
- 12 slices of salami
- ½ inch thick slice of watermelon – enough to cut (6) ½ inch stars out of
- 1 cup blueberries
- 3 strawberries, sliced in half
- 2 oz Monterey jack cheese, slices ½ inch thick – enough to cut (6) ½ inch stars out of
Step by Step Instructions
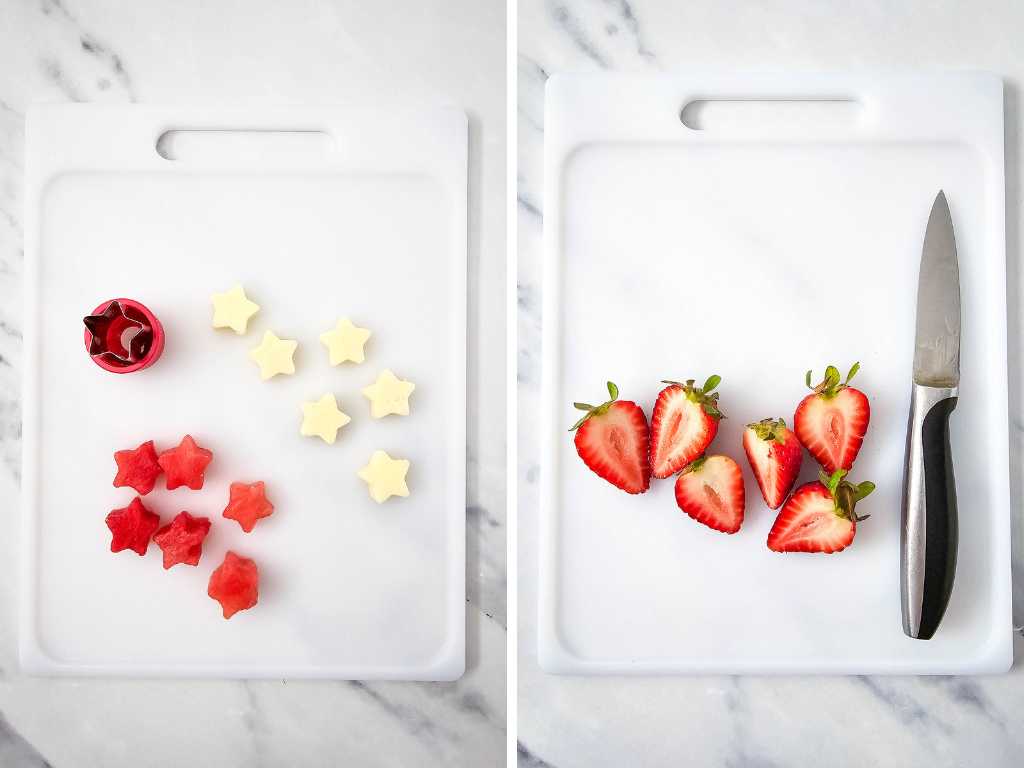
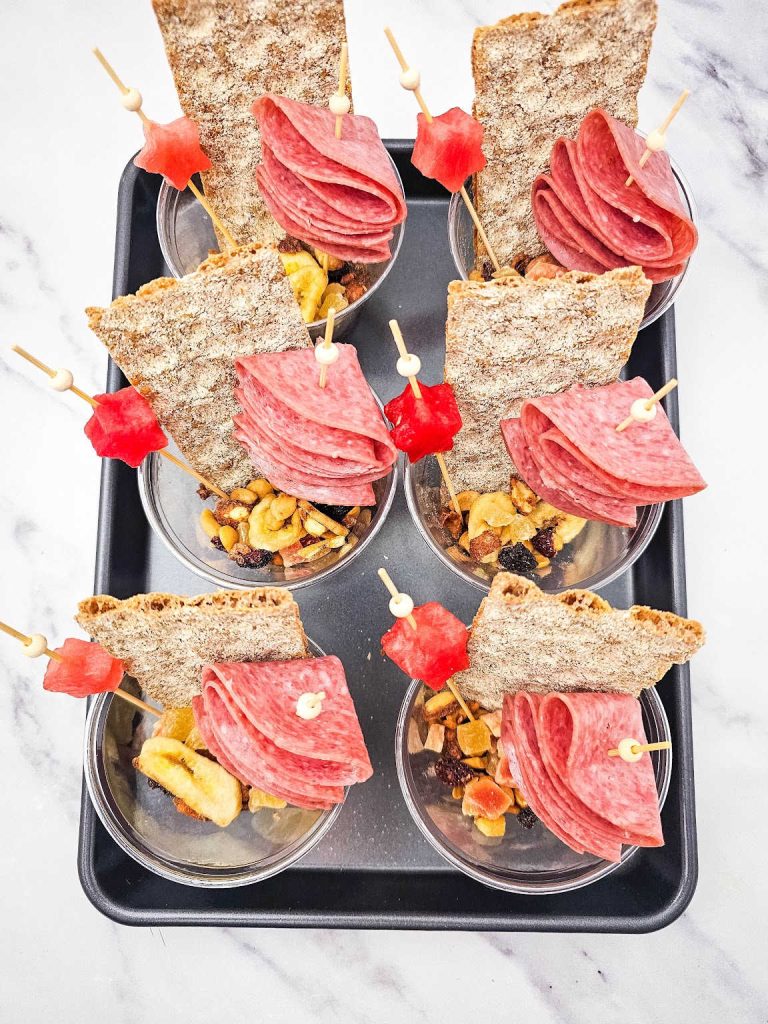
1. Using a small star-shaped cookie cutter, cut out 6 stars from the Monterey Jack cheese and another 6 stars from the watermelon slice. Set aside. Slice each strawberry in half lengthwise to show off the bright red interior.
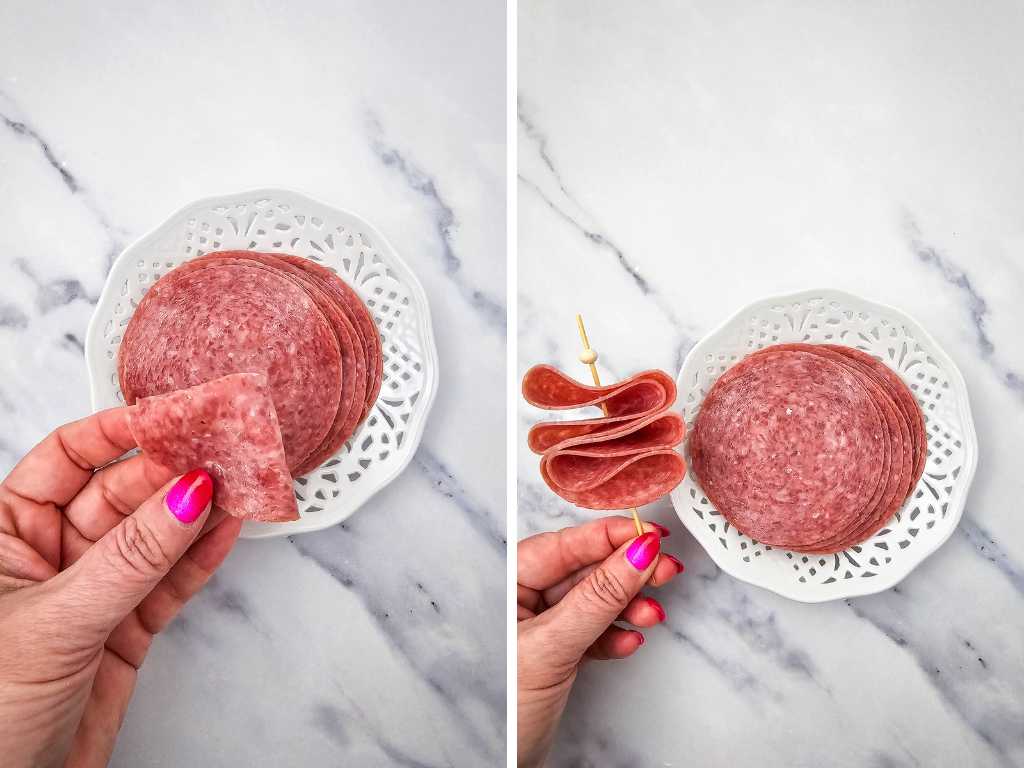
2. Fold one slice of salami in half, then fold it in half again to form a fan shape. Skewer it through the center. Repeat with a second slice, folding and placing it so the folds alternate directions, creating a ribbon-like effect. Repeat this process to make 6 salami skewers.
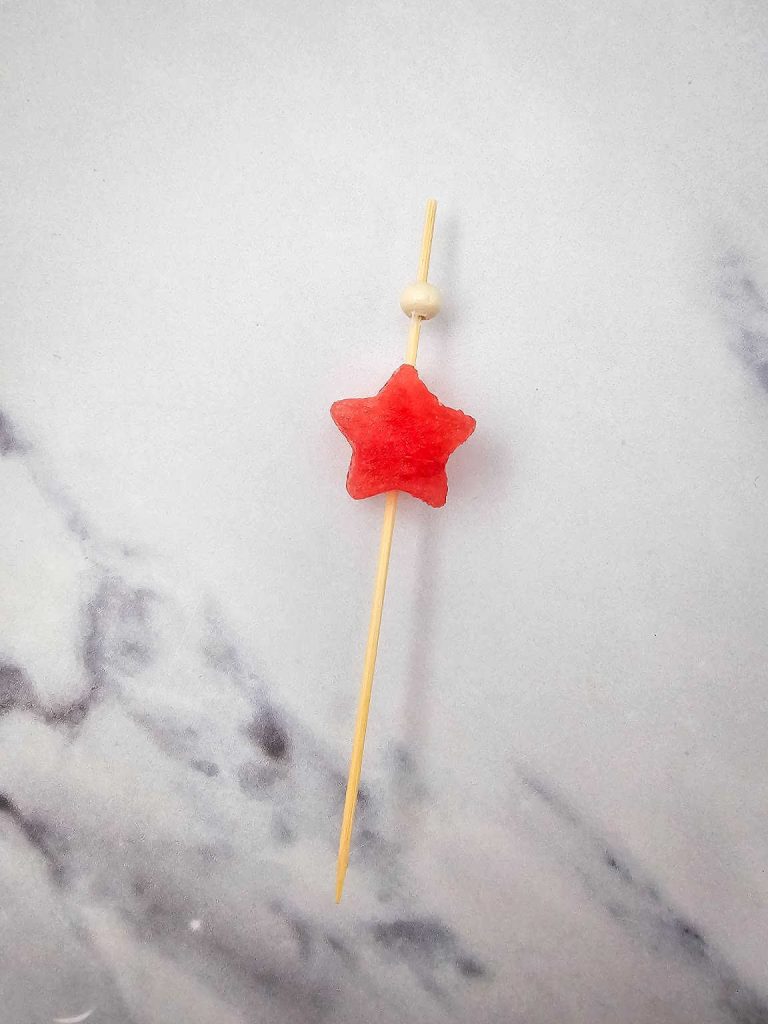
3. Carefully skewer each watermelon star by inserting the skewer through one of the star points, so that is at the top. Make 6 watermelon skewers.
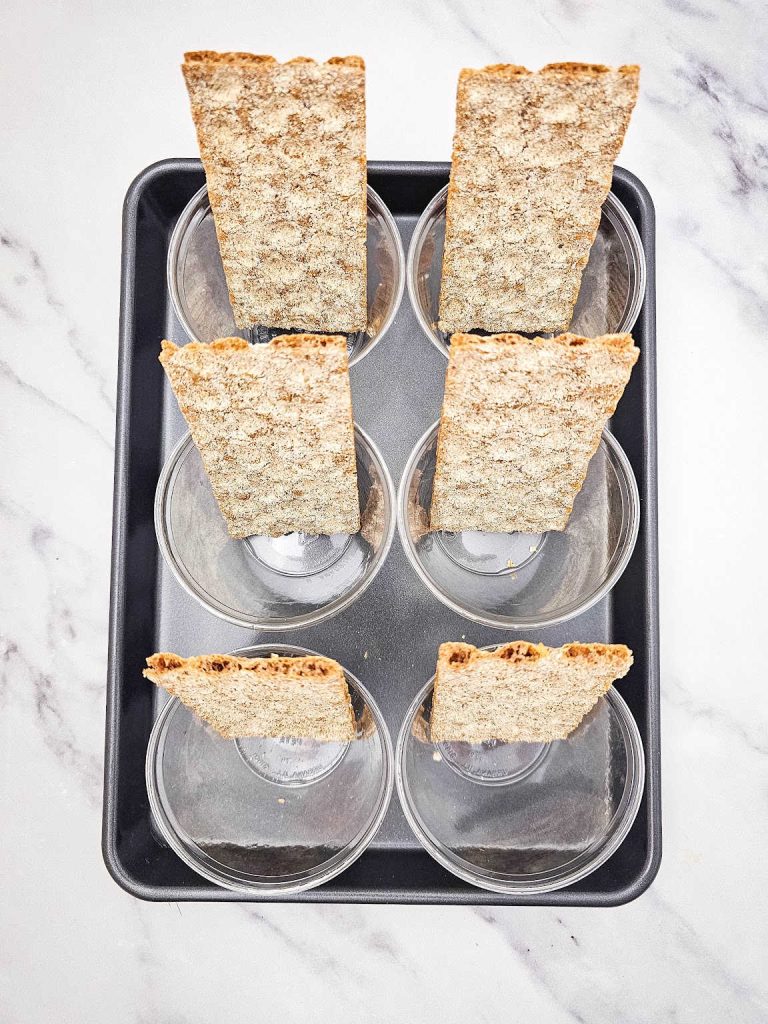
4. Place one large cracker standing upright in the back of each of the 6 clear cups, leaning it slightly against the cup wall for support.
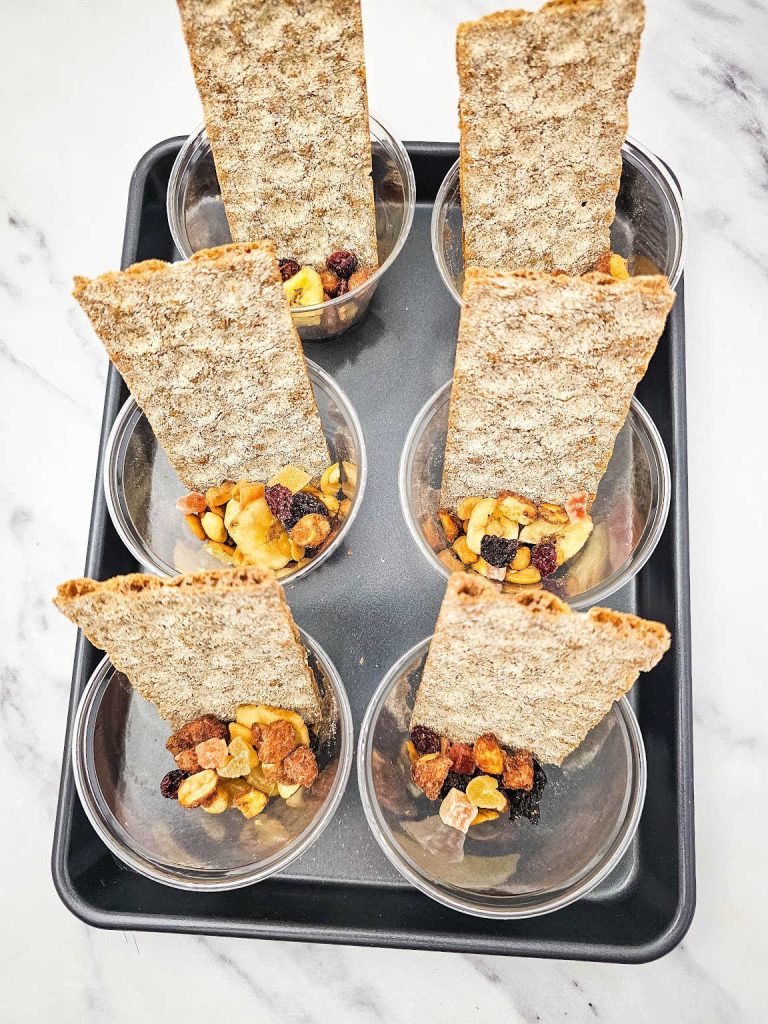
5. Spoon a layer of trail mix into each cup to form the base. Use only about half of the mix for now, saving the rest to finish later.
6. Position the salami skewer on the right side of each cup and the watermelon skewer on the left. Press them gently into the trail mix to anchor them in place.
7. Add the remaining trail mix around the skewers in each cup. This helps stabilize everything and adds more crunch.
8. Spoon blueberries into each cup, filling in any gaps and adding a pop of blue color.
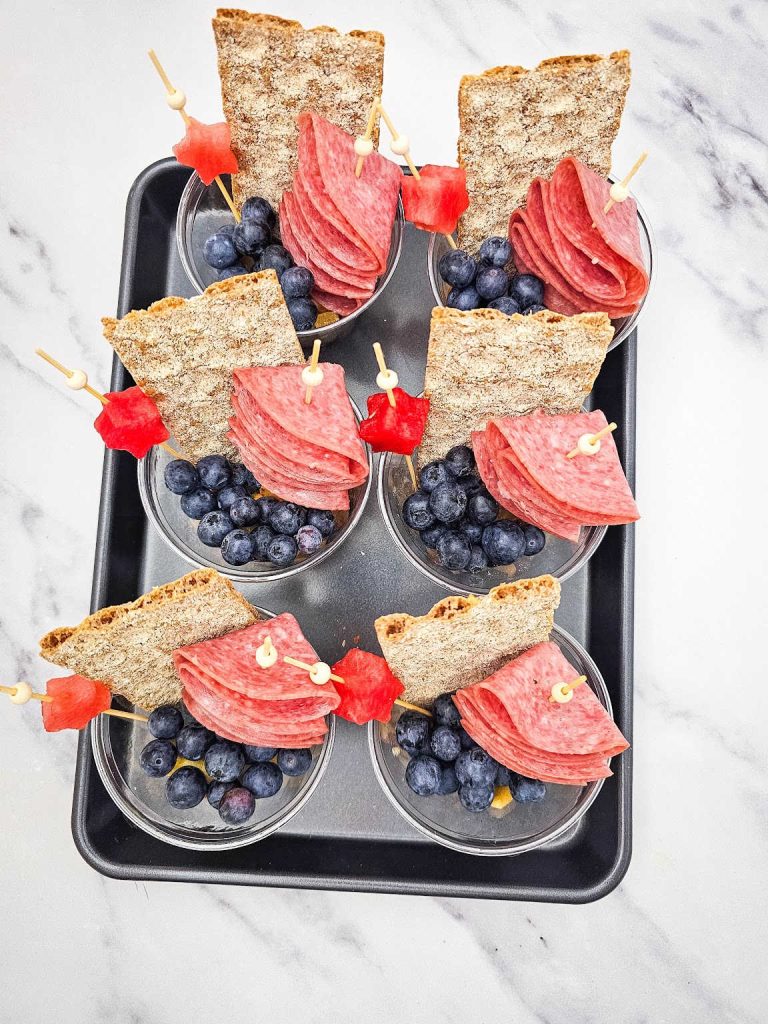
9. Nestle a strawberry half (cut side facing up) on the left side of each cup. Then, place a cheese star on top of the blueberries next to the strawberry for a bold contrast in color and texture.

10. Refrigerate the finished charcuterie cups until serving time to keep everything fresh and flavorful. Serve chilled and enjoy!
These Red, White & Blue Charcuterie Cups aren’t just adorable – they’re bursting with flavor and holiday cheer! With a perfect blend of textures, colors, and patriotic flair, they make an easy yet impressive addition to any Fourth of July snack board. Plus, their grab-and-go style means no mess and no fuss – just happy guests.
More 4th of July Bites
- Red, White and Blue Cheesecake Bites
- Red, White and Blue Fruit Skewers
- Red, White and Blue Fruit Salad
- Red, White and Blue Yogurt Bark
- American Flag Charcuterie Board

Red, White and Blue Charcuterie Cups
Equipment
- 9 oz plastic cups
- Star fruit cutter
- Appetizer skewers
Ingredients
- 6 Large crackers
- 7 oz bag of trail mix (we used tropical, but you can use whatever you like)
- 12 slices of salami
- ½ inch thick slice of watermelon – enough to cut (6) ½ inch stars out of
- 1 cup blueberries
- 3 strawberries, sliced in half
- 2 oz Monterey jack cheese – slices ½ inch thick – enough to cut (6) ½ inch stars out of
Instructions
- Using a small star-shaped cookie cutter, cut out 6 stars from the Monterey Jack cheese and another 6 stars from the watermelon slice. Set aside. Slice each strawberry in half lengthwise to show off the bright red interior.
- Fold one slice of salami in half, then fold it in half again to form a fan shape. Skewer it through the center. Repeat with a second slice, folding and placing it so the folds alternate directions, creating a ribbon-like effect. Repeat this process to make 6 salami skewers.
- Carefully skewer each watermelon star by inserting the skewer through one of the star points, so that is at the top. Make 6 watermelon skewers.
- Place one large cracker standing upright in the back of each of the 6 clear cups, leaning it slightly against the cup wall for support.
- Spoon a layer of trail mix into each cup to form the base. Use only about half of the mix for now, saving the rest to finish later.
- Position the salami skewer on the right side of each cup and the watermelon skewer on the left. Press them gently into the trail mix to anchor them in place.
- Add the remaining trail mix around the skewers in each cup. This helps stabilize everything and adds more crunch.
- Spoon blueberries into each cup, filling in any gaps and adding a pop of blue color.
- Nestle a strawberry half (cut side facing up) on the left side of each cup. Then, place a cheese star on top of the blueberries next to the strawberry for a bold contrast in color and texture.
- Refrigerate the finished charcuterie cups until serving time to keep everything fresh and flavorful. Serve chilled and enjoy!